May 2016

Blogger Templates can be very messed up with lots and lots of code. If you are trying to create a Blogger Template from scratch, the first thing you need is a blank HTML page. That’s exactly what we are going to do today.

How to Make A Blank Template / HTML Page In Blogger.


Demo Here

Follow This Tutorial:


Blogger won’t allow you to just add the following code as template :

<html>
<head>
<title>My Awesome Blank Blog</title>
</head>
<body>
</body>
</html>


They will print out errors if you try to save the template. There are certain criteria for making a template for Blogger Blog :
  1. There must be skin <b:skin></b:skin> in the template
  2. A template must have at least one b:section tag
  3. Every section should have a unique id.
  4. Correct Syntax

If the above criterias are met, Blogger won’t produce any errors when saving the template. For creating a blank HTML Template, we will make sure these criterias are met.

Contents Of Blogger Blank Template:

As we said before, Blogger Templates should meet the criterias of Blogger. A Blank Blogger Template should contain the following :
  1. Basic HTML Page Tags (html, head, body) and their closings
  2. Only one <b:skin></b:skin> tag
  3. Need At least a  <b:section></b:section> tag.

Create Template:

Make sure your blog is using Simple Template.

If not, apply Simple Template to your blog.
  • Go to your Blogger Blog -> Template and click on Edit HTML button. 
  • Remove the contents of Template.

We will now add the Basic HTML page to the Template :

<?xml version="1.0" encoding="UTF-8" ?>
<html xmlns='http://www.w3.org/1999/xhtml' xmlns:b='http://www.google.com/2005/gml/b' xmlns:data='http://www.google.com/2005/gml/data' xmlns:expr='http://www.google.com/2005/gml/expr'>
<head> </head>
<body>
</body>
</html>


Head:

The contents of the <head></head> tag are the title, skin and other elements. We should add the normal codes that are seen on Blogger Templates first :

<meta content='IE=EmulateIE7' http-equiv='X-UA-Compatible'/>
<b:if cond='data:blog.isMobile'>
<meta content='width=device-width,initial-scale=1.0,minimum-scale=1.0,maximum-scale=1.0' name='viewport'/>
<b:else/>
<meta content='width=1100' name='viewport'/>
</b:if>
<b:include data='blog' name='all-head-content'/> 


Add the title :

<title><data:blog.pageTitle/></title>


Add the Skin with basic CSS that can be changed using Blogger’s Template Designer :

<b:skin>
<![CDATA[/*
body {
font: $undefinedbody.font);
color: $undefinedbody.text.color);
background: $undefinedbody.background);
padding: 0 $undefinedcontent.shadow.spread) $undefinedcontent.shadow.spread) $undefinedcontent.shadow.spread);
$undefinedbody.background.override) margin: 0;
padding: 0;
}
]]>
</b:skin>


There are more styles that can be inserted in <b:skin> , but only body’s is mentioned here. By adding more style rules into it, you will be easily able to update the colors, background etc… from the Template Designer.
There are additional CSS files that are loaded by Blogger before <b:skin>

Body

Blogger needs a <b:section> element in template. So, we should add it inside body.

<b:section id='main' showaddelement='yes'/>


This section is the main section of the blog where we can add gadgets to it.

The Whole Code

And the whole Template code would be :

<?xml version="1.0" encoding="UTF-8" ?>
<html xmlns='http://www.w3.org/1999/xhtml' xmlns:b='http://www.google.com/2005/gml/b' xmlns:data='http://www.google.com/2005/gml/data' xmlns:expr='http://www.google.com/2005/gml/expr'>
<head>
<meta content='IE=EmulateIE7' http-equiv='X-UA-Compatible'/>
<b:if cond='data:blog.isMobile'>
<meta content='width=device-width,initial-scale=1.0,minimum-scale=1.0,maximum-scale=1.0' name='viewport'/>
<b:else/>
<meta content='width=1100' name='viewport'/>
</b:if>
<b:include data='blog' name='all-head-content'/>
<title><data:blog.pageTitle/></title>
<b:skin>
<![CDATA[/*
body {
font: $undefinedbody.font);
color: $undefinedbody.text.color);
background: $undefinedbody.background);
padding: 0 $undefinedcontent.shadow.spread) $undefinedcontent.shadow.spread) $undefinedcontent.shadow.spread);
$undefinedbody.background.override) margin: 0;
padding: 0;
}
]]>
</b:skin>
</head>
<body>
<b:section class='main' id='main' showaddelement='yes'/>
<!-- Please Keep The Credits -->
<center><a href="http://prio-soft.blogspot.com">Blank Template By prio-soft</a></center>
</body>
</html>


Additional Code adding

  • Add additional CSS codes inside <skin></skin> 
  •  Add JavaScript codes before </head> or after <head> 
  • Add HTML codes (widgets, code) inside .. You can do all the stuff in this template just like you do it a HTML page.

If you want to display the Posts, add the following code inside <section></section> in body :

<b:widget id='Blog1' locked='true' title='Blog Posts' type='Blog'/>


Example :

<b:section class='main' id='main' showaddelement='yes'>
<b:widget id='Blog1' locked='true' title='Blog Posts' type='Blog'/>
</b:section>


Now Save template and check out your blog. You will now have a plain blank Blog.

Any type of information please Contact us.

Today I am Share a tricks about This URL has been blocked from Department of Telecommunications Problem.It is a major problem when we browsing a web site. It happens DNS server.


When we open a site it's show “Your requested URL has been blocked as per the directions received from Department of Telecommunications, Government of India. Please contact administrator for more information.
Now follow the steps,

Follow Steps:

  1. step Download This App click Here Current Below
  2. Download

    Click to Start Download

    File Size: 1.84MB

  3. step unrar file Password is   priosoft
  4. step Run exe file and visit blocked site its open :D
Any type of information please Contact us.

Readmore option on static page is a problem. This problem may seems to you simple but this is a critical problem for template designer, even I have faced this types of problem when I has started template desiging. Some time we get many blog template but you would see that we can't see the full static page even there has an Readmore option sometime with readmore button. When you just click on Readmore then the page seems to you remain same. As a result if you like a particular template but you are unable to use Blogger static page where we can use those pages  for many important task, Such as About Author, Copyright Policy, Privacy Policy, Advertisement Details, Contact Form etc. So there is a biggest contribution of blogger static page into your blog. Even if you want to get approval from Google AdSense you must include Privacy Policy. So I have decided to share tips that how we can remove readmore option from static page thus you would able to display full static page. So please follow the below Steps.

How to Remove or Hide Read More option from Blogger Static Page.

Remember that different template has different coding for readmore, for this reason I am providing 2 ways to remove or hide the readmore option
  1. Step  Log in to your Blogger Account and Go to your Blogger Dashboard
  2. Step  Click on  Now click on -> Template -> Edit HTML-> Unfold code 
  3. Step  Now Find the code like below by Pressing   Ctrl+F (Windows) or CMD+F (Mac)

Readmore code may vary template to template so concentrate on Read More text only. If you are using Readmore Image then find the Readmore image link

<b:if cond='data:blog.pageType != "item"'>
<a expr:href='data:post.url'>
<div style="text-align: right;">Read More ->></div></a>
</b:if>

Or your readmore code may be like below
<p><b:if cond='data:blog.pageType != &quot;item&quot;'>
<div expr:id='&quot;summary&quot; + data:post.id'><data:post.body/></div>
<script type='text/javascript'>createSummaryAndThumb
(&quot;summary<data:post.id/>&quot;);</script>
<span class='jump-link' style='float:right'><a expr:href='data:post.url'>Read more...</a>
</span></b:if>
<b:if cond='data:blog.pageType == &quot;item&quot;'><data:post.body/></b:if></p>

  • Now simply add the below code
<b:if cond='data:blog.pageType == &quot;static_page&quot;'>
<data:post.body/>
<b:else/>
 Your Template's Existing Readmore Code

</b:if>

  • For Example see the below complete code
<b:if cond='data:blog.pageType == &quot;static_page&quot;'>
<data:post.body/>
<b:else/>
<b:if cond='data:blog.pageType != "item"'>
<a expr:href='data:post.url'>
<div style="text-align: right;">Read More ->></div></a>
</b:if>
</b:if>

Or
<b:if cond='data:blog.pageType == &quot;static_page&quot;'>
<data:post.body/>
<b:else/>
<p><b:if cond='data:blog.pageType != &quot;item&quot;'>
<div expr:id='&quot;summary&quot; + data:post.id'><data:post.body/></div>
<script type='text/javascript'>createSummaryAndThumb
(&quot;summary<data:post.id/>&quot;);</script>
<span class='jump-link' style='float:right'><a expr:href='data:post.url'>Read more...</a>
</span></b:if>
<b:if cond='data:blog.pageType == &quot;item&quot;'><data:post.body/></b:if></p>
</b:if>

If you face any problem just leave a comment below I will reply you as soon as possible.

For B.Sc (Hons) in Computer Science and Engineering(Designed by National University of Bangladesh).

B.Sc (Hons) in Computer Science and Engineering (CSE) Credits By NU

The program of studies a Bachelor of Science with B.Sc (Hons) Degree in Computer Science and Engineering extends over a period of 8 academic terms. A total credit of program  studies is distributed below:

  Total Credits of ALL SEMESTER:


Here The list of total credits of Cse Subjects.

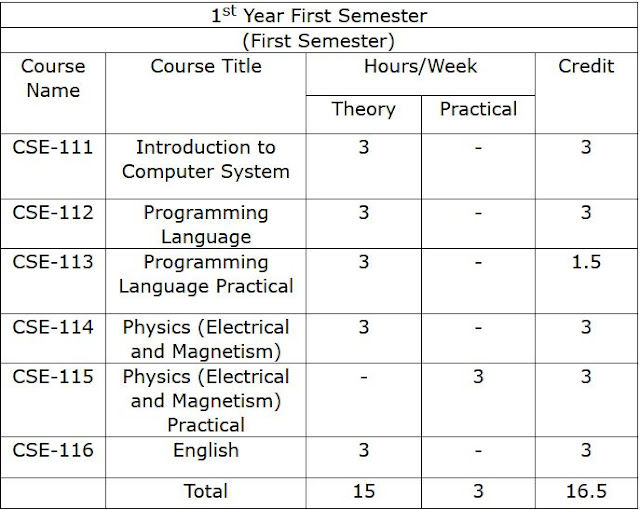
1st Year First Semester:

1st Year First Semester,cse.

1st Year Second Semester:

1st Year 2nd Semester,cse

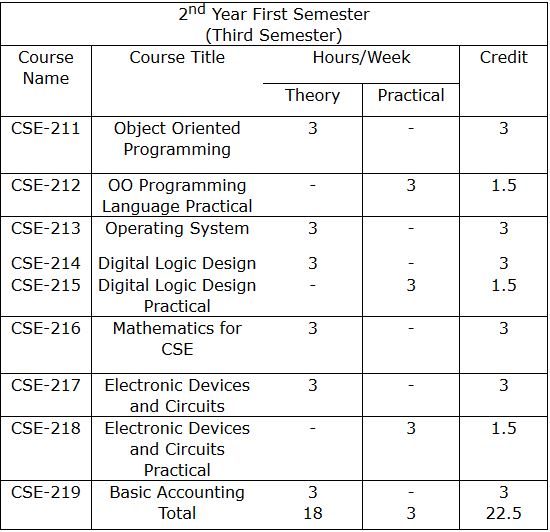
2nd Year First Semester:

2nd Year First Semester,cse

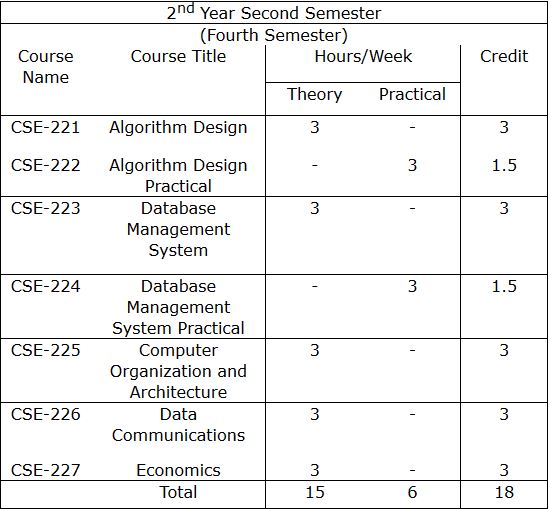
2nd Year Second Semester:

2nd Year 2nd Semester,cse

3rd Year First Semester:

3rd Year First Semester,cse

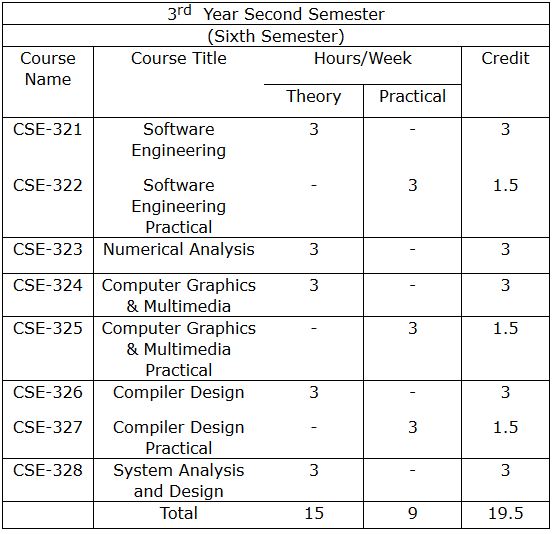
3rd Year Second Semester:

3rd Year 2nd Semester,cse

4th Year First Semester:

4th Year 1st Semester,cse

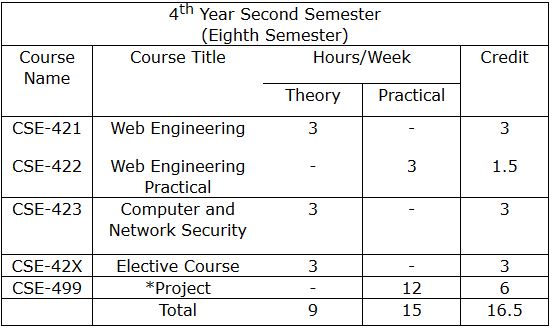
4th Year Second Semester:

4th Year 2nd Semester,cse

*Project work must be started in 7th semester.
  • CSE-42X: Optional Course (Any one) 
  • CSE-424: Image Processing CSE-425: VLSI Design 
  • CSE-426: Simulation and Modeling

Today, I will be showing you guys how to create a simple professional looking download button purely from CSS as outlined on DesignShack So to create and add the button to your website and blog,

Awesome CSS3 Animated Download Button for Blogger.


Just Follow my instruction.


Demo Here

Follow Step:

  1. Step  Log in to your Blogger Account and Go to your Blogger Dashboard
  2. Step  Click on -> Template -> Edit HTML->
  3. Step  Now Find the ]]></b:skin> By Pressing Ctrl+F (Windows) or CMD+F (Mac)
  4. Step  Copy and Paste the below code above ]]></b:skin>

  5. 
    /* CSS loading ball by prio-soft */
     .psoft-button {
        margin: 50px auto;
        width: 200px;
    }
     /* Get this button at prio-soft */
    
    .psoft-button a {
        background: -moz-linear-gradient(center top , #00B7EA 0%, #009EC3 100%) repeat scroll 0 0 transparent;
        color: white;
        display: block;
        font: 17px/50px Helvetica,Verdana,sans-serif;
        height: 50px;
        text-align: center;
        text-decoration: none;
        text-transform: uppercase;
        width: 200px;
        position: relative;
        z-index: 2;
    
      /*TYPE*/
      color: white;
      font: 17px/50px Helvetica, Verdana, sans-serif;
      text-decoration: none;
      text-align: center;
      text-transform: uppercase;
    
      /*GRADIENT*/
      background: #00b7ea; /* Old browsers */
      background: -moz-linear-gradient(top, #00b7ea 0%, #009ec3 100%); /* FF3.6+ */
      background: -webkit-gradient(linear, left top, left bottom, color-stop(0%,#00b7ea), color-stop(100%,#009ec3)); /* Chrome,Safari4+ */
      background: -webkit-linear-gradient(top, #00b7ea 0%,#009ec3 100%); /* Chrome10+,Safari5.1+ */
      background: -o-linear-gradient(top, #00b7ea 0%,#009ec3 100%); /* Opera 11.10+ */
      background: -ms-linear-gradient(top, #00b7ea 0%,#009ec3 100%); /* IE10+ */
      background: linear-gradient(top, #00b7ea 0%,#009ec3 100%); /* W3C */
      filter: progid:DXImageTransform.Microsoft.gradient( startColorstr='#00b7ea', endColorstr='#009ec3',GradientType=0 ); /* IE6-9 */
    }
    
    .psoft-button a, .psoft-button p {
        -webkit-border-radius: 10px;
         -moz-border-radius: 10px;
              border-radius: 10px;
    
      -webkit-box-shadow: 2px 2px 8px rgba(0,0,0,0.2);
         -moz-box-shadow: 2px 2px 8px rgba(0,0,0,0.2);
              box-shadow: 2px 2px 8px rgba(0,0,0,0.2);
    }
    .psoft-button p {
        background: #222222;
        color: #FFFFFF;
        display: block;
        font: 12px/45px Helvetica,Verdana,sans-serif;
        height: 40px;
        margin: -40px 0 0 10px;
        position: absolute;
        text-align: center;
        transition: margin 0.5s ease 0s;
        width: 180px;
        z-index: 1;
      /*TRANSITION*/
      -webkit-transition: margin 0.5s ease;
         -moz-transition: margin 0.5s ease;
           -o-transition: margin 0.5s ease;
          -ms-transition: margin 0.5s ease;
              transition: margin 0.5s ease;
    
    }
    .psoft-button:hover .up {
        margin: -5px 0 0 10px !important;
    }
    .psoft-button:hover .down {
        line-height: 35px !important;
        margin: -85px 0 0 10px !important;
    }
    .psoft-button a:active {
    
    background: #00b7ea; /* Old browsers */
    background: -moz-linear-gradient(top,  #00b7ea 36%, #009ec3 100%); /* FF3.6+ */
    background: -webkit-gradient(linear, left top, left bottom, color-stop(36%,#00b7ea), color-stop(100%,#009ec3)); /* Chrome,Safari4+ */
    background: -webkit-linear-gradient(top,  #00b7ea 36%,#009ec3 100%); /* Chrome10+,Safari5.1+ */
    background: -o-linear-gradient(top,  #00b7ea 36%,#009ec3 100%); /* Opera 11.10+ */
    background: -ms-linear-gradient(top,  #00b7ea 36%,#009ec3 100%); /* IE10+ */
    background: linear-gradient(top,  #00b7ea 36%,#009ec3 100%); /* W3C */
    filter: progid:DXImageTransform.Microsoft.gradient( startColorstr='#00b7ea', endColorstr='#009ec3',GradientType=0 ); /* IE6-9 */
    
    }
    .psoft-button:active .up {
        margin: -20px 0 0 10px !important;
    }
    .psoft-button:active .down {
        margin: -70px 0 0 10px !important;
    }


  6. Click on Save template to apply the CSS code to your blog.
  7. After adding the CSS code to your blog’s template, all you need to do next is add the below line of code where ever you want to add the download button while composing a post.

<div class="psoft-button">
      <a href="FILE_URL">Download</a>
      <p class="up">Click to Start Download</p>
      <p class="down">File Size: 350MB</p>
    </div>

Customization:


The information highlighted in RED are the ones which you must have to change in order for the button to serve the specific purpose you want it to serve.

  • Using a download button in your website or blog, means linking it to the original URL of the file to be downloaded. To link the download button we have just created to the original URL of the file you want your user to have access to once they click on the button, then you will need to replace FILE_URL with the URL of the file (i.e. the address where the file to be downloaded is located).
  • If you wish, you can change the text Click to Start Download to whatever you want.
  • Finally replace 350MB in the text File Size: 350MB to the original size of the file you want your visitors to download. This will tell them the size of the file they will be downloading if they decide to click on the download button.

For questions pertaining to how to add this awesome animated CSS download button to your website and Blogger, please do feel free to ask via the comment box below. ENJOY!
Any type of information please Contact us.

A website is a combination of various graphics, slider, CSS,JavaScript, HTML, Jquery files etc. But in most of the site we see they don't see any loading animation or percentage of loading time. In case of some heavily graphics especially photography website while loading a page it takes longer time. looking little frustrating. Because after visiting few pages visitors will go away due to delay loading time For this reason your site page view will reduce. This thing got me thinking.

Awesome Css Animation Loading Screen Ball For Blogger.

Why don't we use a page loading animation which will give our readers a break with beautiful animation? What do you think about displaying a page loading gif image while the page loads gracefully in site's page background?
Today i will Share two awesome  Css Loading Screen Ball.

Follow Steps:

  1. Login back to your blogger account Select your blog < Template < Edit HTML
  2. Save a backup of your blog template code first, now click inside the template code box.
  3. Now Find the <head> By Pressing Ctrl+F (Windows) or CMD+F (Mac)
  4. Step  Copy and Paste the below code above </head>


<script src='http://ajax.googleapis.com/ajax/libs/jquery/1.7.2/jquery.min.js' type='text/javascript'></script>


If this script above previously has been installed on your blogger template then skip this step

Style 1: Red Ball

  1. Step  Click on -> Template -> Edit HTML->
  2. Step  Now Find the ]]></b:skin> By Pressing Ctrl+F (Windows) or CMD+F (Mac)
  3. Step  Copy and Paste the below code above ]]></b:skin>

  4. 
    /* CSS loading ball by prio-soft */
     #loadhalaman {position:fixed;opacity:0.93;top:0;left:0;background-color:#000;z-index:9999;text-align:center;width:100%;height:100%;padding-top:20%;color:#000;display:none;}
    .loadball {background-color: transparent;border:5px solid rgb(240 ,0 , 0);border-right:5px solid transparent;border-left:5px solid transparent;border-radius:50px;box-shadow: 0 0 35px rgb(255 ,0 , 0);width:50px;height:50px;margin:0 auto;-moz-animation:spinPulse 1s infinite ease-in-out;-webkit-animation:spinPulse 1s infinite linear;}
    .loadball-2 {background-color: transparent;border:5px solid rgb(240 ,0 , 0);border-left:5px solid transparent;border-right:5px solid transparent;border-radius:50px;box-shadow: 0 0 15px rgb(255 ,0 , 0);width:30px;height:30px;margin:0 auto;position:relative;top:-50px;-moz-animation:spinoffPulse 1s infinite linear;-webkit-animation:spinoffPulse 1s infinite linear;}
    @-moz-keyframes spinPulse {0% { -moz-transform:rotate(160deg); opacity:0; box-shadow:0 0 1px rgb(255, 0, 0)}50% { -moz-transform:rotate(145deg); opacity:1; }100% { -moz-transform:rotate(-320deg); opacity:0; }}
    @-moz-keyframes spinoffPulse {0% { -moz-transform:rotate(0deg); } 100% { -moz-transform:rotate(360deg); }}
    @-webkit-keyframes spinPulse {0% { -webkit-transform:rotate(160deg); opacity:0; box-shadow:0 0 1px rgb(255, 0, 0)} 50% { -webkit-transform:rotate(145deg); opacity:1;} 100% { -webkit-transform:rotate(-320deg); opacity:0; }}
    @-webkit-keyframes spinoffPulse {0% { -webkit-transform:rotate(0deg); } 100% { -webkit-transform:rotate(360deg); }}
    

  5. Step Locate <body> By Pressing Ctrl+F (Windows) or CMD+F (Mac) and copy the
    below JavaScript and paste it above/before </body>

  6.  
     <div id='loadhalaman'>
    <div class='loadball'></div>
    </div>
    <script type='text/javascript'>
    $undefinedfunctionundefined) {
    var siteURL = "http://" + top.location.host.toStringundefined);
    var $internalLinks = $undefined"a[href^='"+siteURL+"'], a[href^='/'], a[href^='./'], a[href^='../']");
    $internalLinks.clickundefinedfunctionundefined) {
    $undefined'#loadhalaman').fadeInundefined1500).delayundefined6000).fadeOutundefined1000);
    });
    
    // Remove overlay when clicked to overcome interference, especially if the internal link is set to target='_blank'
    $undefined'#loadhalaman').clickundefinedfunctionundefined) {
    $undefinedthis).hideundefined);
    });
    });
    </script>
    
  7. Step 5 You're done. Now Save template and see result by refreshing page.


Style 2: Blue Ball


  1. Step  Log in to your Blogger Account and Go to your Blogger Dashboard
  2. Step  Click on -> Template -> Edit HTML->
  3. Step  Now Find the ]]></b:skin> By Pressing Ctrl+F (Windows) or CMD+F (Mac)
  4. Step  Copy and Paste the below code above ]]></b:skin>

  5. 
    /* CSS loading ball by prio-soft */
      .ball {
    background-color: rgba(0,0,0,0);
    border:5px solid rgba(0,183,229,0.9);
    opacity:.9;
    border-top:5px solid rgba(0,0,0,0);
    border-left:5px solid rgba(0,0,0,0);
    border-radius:50px;
    box-shadow: 0 0 35px #2187e7;
    width:50px;
    height:50px;
    margin:0 auto;
    -moz-animation:spin .5s infinite linear;
    -webkit-animation:spin .5s infinite linear;
    }
    .ball1 {
    background-color: rgba(0,0,0,0);
    border:5px solid rgba(0,183,229,0.9);
    opacity:.9;
    border-top:5px solid rgba(0,0,0,0);
    border-left:5px solid rgba(0,0,0,0);
    border-radius:50px;
    box-shadow: 0 0 15px #2187e7;
    width:30px;
    height:30px;
    margin:0 auto;
    position:relative;
    top:-50px;
    -moz-animation:spinoff .5s infinite linear;
    -webkit-animation:spinoff .5s infinite linear;
    }
    @-moz-keyframes spin {
    0% { -moz-transform:rotate(0deg); }
    100% { -moz-transform:rotate(360deg); }
    }
    @-moz-keyframes spinoff {
    0% { -moz-transform:rotate(0deg); }
    100% { -moz-transform:rotate(-360deg); }
    }
    @-webkit-keyframes spin {
    0% { -webkit-transform:rotate(0deg); }
    100% { -webkit-transform:rotate(360deg); }
    }
    @-webkit-keyframes spinoff {
    0% { -webkit-transform:rotate(0deg); }
    100% { -webkit-transform:rotate(-360deg); }
    }
    

  6. Step Locate <body> By Pressing Ctrl+F (Windows) or CMD+F (Mac) and copy
    the below JavaScript and paste it above/before </body>

  7.  
     <div id='loadhalaman'>
    <div class='loadball'></div>
    <div class='loadball1'></div>
    </div>
    <script type='text/javascript'>
    $undefinedfunctionundefined) {
    var siteURL = "http://" + top.location.host.toStringundefined);
    var $internalLinks = $undefined"a[href^='"+siteURL+"'], a[href^='/'], a[href^='./'], a[href^='../']");
    $internalLinks.clickundefinedfunctionundefined) {
    $undefined'#loadhalaman').fadeInundefined1500).delayundefined6000).fadeOutundefined1000);
    });
    
    // Hilangkan overlay saat diklik untuk mengatasi gangguan, terutama jika link internal diset dengan target='_blank'
    $undefined'#loadhalaman').clickundefinedfunctionundefined) {
    $undefinedthis).hideundefined);
    });
    });
    </script>
    

  8. Step 5 You're done. Now Save template and see result by refreshing page.


Hope you understand that, how to add Awesome Css Loading Screen Ball blogger widgets
on blog or blogger site. If you have any problem, then feel free to communicate by comment box. If you like this widget, then don't forget to share this post with your social media.
Any type of information please Contact us.

Basically engineering students need a Good quality Scientific Calculator for Problem Solving.Now-a-days several duplicate and local companies calculator are available in the market with low prize and impressive outlook for sales. But they didn't care about battery cell backup , button quality and more features such as software also.

How to Test/Check/Hack Casio Scientific Calculator fx-991MS, fx-991ES (Calculator Trick!).


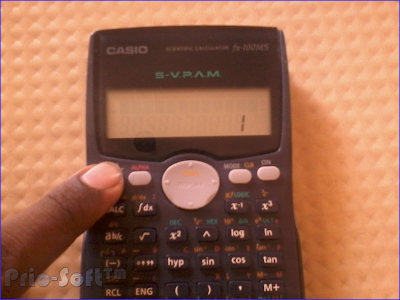
Here are some steps to check whether the calculator software is original,

Follow Steps:


  1. Step : Press and hold Following Three buttons at same time

  2. How to Test/Check/Hack Casio Scientific Calculator fx-991MS, fx-991ES (Calculator Trick!).

    Shift button
    ➳Number7 button
    ONbutton.

    ➳Now in the display screen, you should see all options or all pixels are ON.

    How to Test/Check/Hack Casio Scientific Calculator fx-991MS, fx-991ES (Calculator Trick!).


  3. Step : Then press Shift button continuously till Number 1 appears on the screen.

  4. How to Test/Check/Hack Casio Scientific Calculator fx-991MS, fx-991ES (Calculator Trick!).

  5. Step: Now press all the buttons in the calculator starting fromAlpha button sequentially, except  for the ON button..

  6. How to Test/Check/Hack Casio Scientific Calculator fx-991MS, fx-991ES (Calculator Trick!).

  7. Step: After pressing all buttons,

➳finally press =
➳then it should show 44 Ok .
➳If it shows, 44 OK' then the calculator is good for your Engineering Mathematics..

If u Confuse or not understood please watch this video given current below:


Basically CASIO is a Good brand for Calculators...
Enjoy Calculating :-)

This is the most frustrating moment one can ever face. Played with passion from a small village to a powerful one. It took months and sleepless night to build that Village :( But suddenly on one very bad day you lost your Village.

Get Back Your Lost or Hack Clash Of Clans

Situation like above is common with players mostly newbies who are playing for the first time and don’t know how game works. We never bother to link our game to save progress and ends up loosing whole village. Reasons are simple :
  • Mobile stopped working and need servicing. Entire data like Apps and Game is deleted. So does your Game.
  • Rooted mobile and having trouble adding Gmail Account on Android device.
  • Unaware about the account linking up process. Don’t know how to save.
Point number two was one of my friend’s problem. Having a rooted Android mobile was making him unable to link COC with Google ID (though rooting doesn’t cause such problems). He went on battle without any saving mechanism :) and was doing pretty good with TH8. One day luck was in bad mood and device stopped working. He completely lost his Clash of Clans Village as all data was erased. So how he managed to get back lost COC village ?

That’s what I’ll be sharing here. Normal messaging quiz with Supercell team will let you regain your lost Clash of clans account.

Get Back Lost Clash Of Clans Village


I never thought getting back COC account would be so easy. All you need to do is simple task. Process is as follows :

  1. Step  : Open Clash of Clans and tap on setting section. Here you will find help and support section. This section gives solutions to all your queries about game. Below is the hint page
  2. Lost Clash Of Clans Village

    Get Back Your Lost or Hack Clash Of Clans
    Get Back Lost COC Village

  3. Steps  : Lost Village could be clearly seen on second number. Tap on this topic and find your appropriate thread.

  4. Get Back Your Lost or Hack Clash Of Clans
    Get Back Lost COC Village

  5. Step : Click on I lost my village! How do I get it back ?, or something like that. Here you will get all detail about procedure. But for your convenience, let me explain you.

  • At top right corner tap on message button and type your question. This will be your query to Supercell team.
Get Back Your Lost or Hack Clash Of Clans
Get Back Lost COC Village
  • Now get ready with few details which you need to make a perfect reply. Details like :
    Your Game Name, Village Name or User Name (All are same).
    Clan Name If any.
    Exact Town Hall Level.
   Exact experience level.

Reply all these exact details when asked by support team through message. After verifying your details and searching through their database Supercell team will get back to you in few days. Processing time may take up to few days. In my friend’s case it took around 4 days.

After complete verification you will get Alphanumeric code through message which you need to enter on Game through link a device option. Don’t worry whole procedure will be explained completely on message itself.

So, this was your solution. If you or your friend is having same issue then follow the same procedure and get back lost Clash of Clans Village without any problem.

For any query feel free to ask us via comment section. I’ll be happy to help. :)

Clash On..!!

List style means numeric serial that can be used in Blog post. Generally by default Blog has list style option where by selecting two or more line if we click on List option then it will automatically add the serial number per line.


You don't have to worry about adding the HTML, because the editor does it for you by using this tool. If you go to the HTML tab, you'll see that the list you created appears something like this:

<ol> <li>The content of the 1st. element</li>
<li>The content of the 2nd. element</li>
<li>The content of the 3rd. element</li>
<li>The content of the 4th. element</li>
etc... </ol>


This tool will automatically number each element of the list taking an "order", hence the name "ordered lists in HTML". In each element a number is successively generated (from 1 onewards), though you can not see this in the HTML code.

Using ordered lists in posts

Creating numbered lists is very suitable for giving any instructions. It is ideal for cooking blogs where the steps in a recipe has to be numbered, or in those blogs that share tutorials... but can be used in any type of blog that need to number something.

1.National University Gazipur 
2.University of Dhaka ,Dhaka Bangladesh
3.University of Engineering and Technology, Dhaka 
4.BRAC University Dhaka ...
5.American International University-Bangladesh, Dhaka 
6.Daffodil International University ,Dhaka 
7.Rajshahi University ,Rajshahi 
8.North South University
9.Jahangirnagar University 
10.Savar Chittagong ,University

However, we can customize the elements on the list with CSS

How to Add Some Amazing Styles to Blogger ordered lists 

  • Login to your Blogger account, go to Blogger dashboard, click the arrow adjacent to 'Go to post list icon' and select 'Template' from dropdown menu. You can also select the 'Template' from left navigation menu.
  • Click 'Edit HTML'.
  • search for (Ctrl+F]]></b:skin> and paste (Ctrl+V) the following  css style 1or 2 or 3 code just after ]]></b:skin>

Example

Here are three examples that I have prepared for those of you who want to customize numbered lists:
 

Style 1

  1. National University Gazipur  
  2. University of Dhaka Dhaka  Bangladesh 
  3. University of Engineering and Technology Dhaka  
  4. BRAC University Dhaka ... 
  5. American International University-Bangladesh Dhaka  
  6. Daffodil International University Dhaka 
  7. Rajshahi University Rajshahi  
  8.  Jahangirnagar University Savar  
  9.  Chittagong University Chittagong 
  10. North South University

.post ol{

counter-reset: li;

list-style: none;

*list-style: decimal;

font: 13px 'trebuchet MS', 'lucida sans'; /* font size of each element */

padding: 0;

margin-bottom: 4em;

text-shadow: 0 1px 0 rgba(255,255,255,.5);

font-weight: bold;

}

.post ol li{

position: relative;

display: block;

padding: .4em .4em .4em 4em;

*padding: .4em;

margin: .5em 0;

text-decoration: none;

border-radius: .3em;

transition: all .3s ease-out;

}


.post ol li:hover:before{

transform: rotate(360deg);

}


.post ol li:before{

content: counter(li);

counter-increment: li;

position: absolute;   

left: 10px;

top: 50%;

margin-top: -1.3em;

height: 2em;

width: 2em;

line-height: 2em;

color: #fff; /* text color of numbers */

background: #FA8022; /* background color of numbers */

border: .2em solid #fff; /* border color */

-webkit-box-shadow: 0 8px 5px -7px #888;

-moz-box-shadow: 0 8px 5px -7px #888;

box-shadow: 0 8px 5px -7px #888;

text-align: center;

font-weight: bold;

border-radius: 2em;

transition: all .3s ease-out;

}

Style 2


  1. National University Gazipur  
  2. University of Dhaka Dhaka  Bangladesh 
  3. University of Engineering and Technology Dhaka  
  4. BRAC University Dhaka ... 
  5. American International University-Bangladesh Dhaka  
  6. Daffodil International University Dhaka 
  7. Rajshahi University Rajshahi  
  8.  Jahangirnagar University Savar  
  9.  Chittagong University Chittagong 
  10. North South University

.post ol{

counter-reset:li;

list-style: none;

*list-style: decimal;

margin-left:0;

padding-left:0

}

.post ol li{ 

position:relative;

margin:0 0 20px 15px !important;

padding:4px 5px 4px 10px !important;

list-style:none;

*list-style: decimal;

border-bottom:1px solid #e2e3e2; /* bottom border of each element */

background:#f2f2f2; /* background color of each element */

text-indent:14px;

}

.post ol li:before{ 

content:counter(li);

counter-increment:li;

position:absolute;

top:-6px;

left:-10px;

font-family:'Oswald', serif;

font-size:14px; /* size of the numbers */

width:20px;

margin:0 0 10px 0;

padding:4px !important;

color:#A5A5A5; /* color of the numbers */

text-align:left;

background:#e2e2e2; /* background color of the numbers */

text-indent:6px;

text-shadow: 1px 3px 2px #fff;

}

.post ol li:after{

content:"";

position:absolute;

top:-5px;

left:17px;

width: 0px;

height: 0px;

border-style: solid;

border-width: 5px 0 0 5px;

border-color: transparent transparent transparent #aeaeae; /* color of the triangle behind */

}

Style 3

  1. National University Gazipur  
  2. University of Dhaka Dhaka  Bangladesh 
  3. University of Engineering and Technology Dhaka  
  4. BRAC University Dhaka ... 
  5. American International University-Bangladesh Dhaka  
  6. Daffodil International University Dhaka 
  7. Rajshahi University Rajshahi  
  8.  Jahangirnagar University Savar  
  9.  Chittagong University Chittagong 
  10. North South University

.post ol{

counter-reset: li;

list-style: none;

*list-style: decimal;

padding: 0;

margin-bottom: 4em;

font: 13px 'trebuchet MS', 'lucida sans'; /* font size of each element */

text-shadow: 0 1px 0 rgba(255,255,255,.5);

}

.post ol li{

position: relative;

display: block;

padding: .4em .4em .4em .8em;

*padding: .4em;

margin: .5em 0 .5em 4.5em;

text-decoration: none;

}

.post ol li:before{

content: counter(li);

counter-increment: li;

position: absolute;   

left: -30px;

top: 50%;

margin-top: -1em;

background: #bada55; /* background color of the numbers */

height: 2em;

width: 2em;

line-height: 2em;

text-align: center;

font-weight: bold;

}

.post ol li:after{

position: absolute;

content: '';

left: -5px;

margin-top: -.7em;   

top: 50%;

width: 0; 

height: 0; 

border-top: 8px solid transparent;

border-bottom: 8px solid transparent; 

border-left:8px solid #bada55; /* background color of the right arrow*/

}

Customization: 

In blue are highlighted the values that can be edited in the CSS of these three examples, and added some comments highlighted in /* green */, so that you can know what each thing does.

 Compatibility:

This will work in all browsers including IE8 - in the case of Internet Explorer 7, the number' styles will not be seen as it does not support the :before or :after pseudo-elements. However, I have added a line in the CSS that's specific for that browser and will bring up the default numbering of the ordered list.
Hopefully this will be useful for you ;)

We knows about Facebook fan/Like box algorithm. But Twitter didn't reveal their fanbox like Facebook. So here is the little code that you can use to make your customized twitter fan box. The code for this Fan box is created by MarkCarey. You can use this twitter fan following box to increase your twitter followers. It will help you in bringing more traffic from twitter. Follow the steps below to add this easy to use Fan box to your Blogger Blogs.


Follow Steps:

Step 1 Log in to your Blogger account and Go to your Blogger Dashboard.
Step 2 Go to your Layout tab.
Step 3 Click on "Add a Widget" then select "HTML/JavaScript" Widget.
Step 4 Now Copy the below code and Paste it in "HTML/JavaScript"
<script type="text/javascript" src="http://s.moopz.com/fanbox_init.js"></script> <div id="twitterfanbox"></div> <script type="text/javascript">fanbox_initundefined"prio_soft");</script>

Customization: 

  • Replace prio_soft with your twitter username

Step 5 Now Save  your widget and you are done!If you like this widget, then don't forget to share this post with your social media.
Any type of information please Contact us.

In this post, i am going to share with you custom stats blogger widget. By using this widget you can display total page views, total posts and total comments of your blog. Only blogger has total page views widget. After that time, i modify some css and added some script for total posts and total comments. The design of this widget is modern and clean. I used some icons using font awesome. Installing custom stats widget is very useful blogger widgets


It is very unique and smart design. Some of friends requested me to share this blogger widgets. After that time now i am share this with new look and one more extra features. This blogger widgets help you to display Total page views, comments and total posts of your blog. People who want make their blog more attractive and beautiful, some blogger widgets make them easy.


Demo Here

How to install custom stats blogger widget

Here is some very simple steps to installing custom stats blogger widget. In this blogger widget i used font awesome icons and PT Sans google font. So you have also need to adding These fonts on your blog. If font awesome already added on your blog. then ignore it.

Follow Step: 

Step 1 Log in to your Blogger Account and Go to your Blogger Dashboard
Step 2 Go to your Layout tab.
Step 3 Click on "Add a Gadget" then select "Blog's stats" Widget.


Step 4 Now remove the Title in Stats widget configuration and under Time period select All Time.


<
Step 5 In case of style select second one. And Press the Save Button after configuration.  

Modifying the Default Custom Stats: 

Step 1 Click on Now click on -> Template -> Edit HTML
Step 2 Now find the below code by Pressing Ctrl+F (Windows) or CMD+F (Mac)
<b:widget id='Stats1' locked='false' title='Custom Stats' type='Stats' version='1' visible='true'>...</b:widget>

Step 3  Now replace this line with below codes.
<b:widget id='Stats1' locked='false' title='Custom Stats' type='Stats' version='1' visible='true'>
    <b:includable id='main'>
  <b:if cond='data:title'><h2><data:title/></h2></b:if>
  <div class='widget-content'>
    <!-- Content is going to be visible when data will be fetched from server. -->
    <div expr:id='data:widget.instanceId + &quot;_content&quot;' style='display: none;'>
      <!-- Counter and image will be injected later via AJAX call. -->
      <b:if cond='data:showSparkline'>
        <img alt='Sparkline' expr:id='data:widget.instanceId + &quot;_sparkline&quot;' height='30' src='http://2.bp.blogspot.com/-nsxCtkYnchQ/VLEifAyf97I/AAAAAAAAIlk/9Viyy0W9r04/s1600/FFF.png' title='Sparkline' width='75'/>
      </b:if>
      <b:if cond='data:showGraphicalCounter'>
        <span class='counter-wrapper graph-counter-wrapper' expr:id='data:widget.instanceId + &quot;_totalCount&quot;'/>
      <b:else/>
        <span class='counter-wrapper text-counter-wrapper' expr:id='data:widget.instanceId + &quot;_totalCount&quot;'/>
      </b:if>
<script type='text/javascript'>
function postCountundefinedjson){
document.writeundefined&quot;<span class='counts post2'> Total Posts &quot;);
var count = json.feed.openSearch$totalResults.$t;
document.writeundefined&quot;<span class='count'>&quot; + count + &quot;</span>&quot;);
document.writeundefined&quot;</span>&quot;)
}

function numberOfCommentsundefinedjson){
document.writeundefined&quot;<span class='counts comment'> Total Comments &quot;);
var count = json.feed.openSearch$totalResults.$t;
document.writeundefined&quot;<span class='count'>&quot; + count + &quot;</span>&quot;);
document.writeundefined&quot;</span>&quot;)
}

</script>
<script src='/feeds/posts/default?alt=json-in-script&amp;amp;max-results=0&amp;amp;callback=postCount' type='text/javascript'/>
<script src='/feeds/comments/default?alt=json-in-script&amp;amp;max-results=0&amp;amp;callback=numberOfComments'/>


    </div>
  </div>
</b:includable>
  </b:widget>

Step 4 You're 80% done. Now paste all below CSS Codes before </head>


<link href='//fonts.googleapis.com/css?family=PT+Sans:400,700' rel='stylesheet' type='text/css'/>
<link href='//maxcdn.bootstrapcdn.com/font-awesome/4.5.0/css/font-awesome.min.css' rel='stylesheet'/> 
<style type='text/css'>
/* Blogger Custom Stats widget by prio-soft */
.Stats img {display:none!important;background-image:none;}
.Stats .counter-wrapper {width:92%;text-align:right;margin:10px;line-height:35px;color:#333;font-weight:700;font-size:16px;margin-left: 0;}
.Stats .counter-wrapper:after {content:&quot;Page Views&quot;;float:left;text-align:left;font-size:13px;font-weight:700;color:#333;}
.counts {display:inline-block;width:92%;font-size:13px;line-height:35px;color:#333;font-weight:700;}
.counts .count {display:inline-block;font-size:16px;height:30px;
vertical-align:top;direction:ltr;float:right;color:#333;font-weight:700!important;}
.counts:hover .titles:before {color:#333!important;border-radius:2px;border-color:rgbaundefined255,255,255,0.1);}
.counter-wrapper.text-counter-wrapper:before, .counts:before {display:inline-block;font-size:13px;font-family:FontAwesome;font-style:normal;font-weight:normal;margin:0 10px 0 10px;float:left;width:10px;text-align:center;}
.counter-wrapper.text-counter-wrapper:before, .counts:before {
display:block;background-color:#fff;color:#333;width:35px;height:35px;font-size:18px;line-height:35px;border-radius:2px;margin:0px 8px 0 0;}
.counter-wrapper.text-counter-wrapper:before {content:&quot;\f06e&quot;;}
.counts.post2:before {content:&quot;\f044&quot;;}
.counts.comment:before {content:&quot;\f0e6&quot;;}
#Stats1_content {width:auto;height:auto;background-color:#fff;}
</style>

Step 5 You're done. Now Save template and see result by refreshing page.

Hope you understand that, how to add custom stats blogger widgets on blog or blogger site. If you have any problem, then feel free to communicate by comment box. If you like this widget, then don't forget to share this post with your social media.
Any type of information please Contact us.
Winzip Pro 20.5 Full + Serial Key is the latest version of the indisputably best archiving program that you can buy today. The company behind it, can back up that claim with their 2 decade long experience developing such software. Winzip Pro 20 Full Crack can be used to compress and decompress files. Compressing files is very useful for saving up space on your disk drive, so you have enough room for more files and applications. Decompressing files will bring them back to their original size. Winzip Pro 20.5 full version allows you to share files via cloud services, social media and email which is perfect for saving files remotely for future use.


WinZip features:

✔Instant zipping and unzipping
✔Complete file management for local, network and cloud files
✔Trusted AES encryption for safe file sharing
✔Simplified sharing by email
✔Direct sharing to cloud services, social media and IM

WinZip Pro : 

✔ENHANCED! Zip files from any location
✔NEW! More sharing options
✔NEW! Scan and Share
✔NEW! Snap and Share
✔NEW! More robust file management
✔NEW! Previewer
✔NEW! Job Wizard Super Picker

System Requirements:

✔Windows 10
✔Windows 8
✔Windows 7
✔Windows Vista
✔Windows XP
✔Internet Explorer 8 or later


Download:

Download

Click to Start Download

File Size: 134 MB

Install Notes:

  • Install WinZIP Pro by running winzip205.exe 
  • Extract RAR then use the provided keys in Serial key.txt or make a new one using Keygen. 
  • Done!

PPC (Pay per Click) or CPC is the term which mostly commonly used in advertising industry. Any person or company who belongs to advertisement industry as advertiser or publisher always focus on PPC. Now the question is what does PPC is ?. In short it mechanism followed for serving ads. Advertisers want traffic on their website so they invest in ads on the bases of pay per click. On the other side publishers want to earn money so they place ads on their website or blog which pay him on the of pay per click. So that means PPC is the main reason behind the relationship of advertiser and publisher. Through 3rd party ppc ad networks, advertiser who want visitors for their business. Publisher who want to earn revenue for placing ads. Both parties join ppc ad network according to their need. Means when the visitors of Publisher site click on the  advertiser ads unit. Then Advertiser have to Pay for each successful valid click. So if you want understand the whole concept of PPC then i recommend to read How Does  PPC Works ?


Every Blogger or Webmaster dreams to make some money from there website or blog through ads. PPC ads is the effective way to earn revenue for content. By placing Pay per click ads on web page where huge traffic is coming. When someone show interest in ad and visit it. Then publisher will earn money. But major problem faced by advertiser and publisher is while finding best ppc ad networks. Their are many best pay per click sites are available in market but some of them are paying to much low. So in this article i am going to list out best ppc ad networks for publishers & Advertisers. Choose according to your requirement and blog traffic.

Best (Pay Per Click) PPC Ad Network For Publishers:

Google Adsense

Google Adsense is one of the best pay per click site. No doubt every blogger and website owner wants to earn through Adsense because there are reasons behind the success and Adsense Popularity. In short Adsense is Bid based CPC and RPM networks and there are lots of advertisers bases on the niche of sites. Adsense offers highest CPC rates and show more targeted ads related to content which increase the CTR rate and helps to earn more revenue. Adsense rates varies on the bases of relevant and irrelevant ads. It CPC rate vary between the range of $0.02 – $15 depend upon the location of visitor and niche of the blog.
Ad Format:- Responsive Ads, Display Ads, Text Ads, Link Ads, Match Content Ads.
Payout:- $100 via cheque, EFT, Wired transfer, Western Union.Google Adsense sign up

Bidvertiser


Bidvertiser is also a best choice if you are not able to get an approval from Adsense. Bidvertiser is also famous and oldest best pay per click site and even perform well at some kind of blogs. It CPC rates are best as compare to other small networks just because they offer POP up, Banner and various other typing advertising techniques. Its CPC rates vary from approx 0.02 to $10 and you get earning bases on total earn point. Overall performance is best if have sufficient account of traffic.
Ad Format:- Banner Ads, In-text, Domain Parking, XML Feed ads, Contextual Ads, Search Toolbar
Payment:- Minimum Payout $10 via PayPal.Bidvertiser sign up

RevenueHits


RevenueHits is the best ppc ad network for publishers who want to generate more revenues with state of the art Contextual & Geo targeted Ad Serving technology. RevenueHits provides self services for publishers, where any webmaster can come and get tags and start making money. They also offers a self service for Advertisers, where anyone can come and buy very high quality traffic.
Bottom line – if you want to take your website or blog’s income generation to the next level, this is the best solution around. RevenueHits is the best ad network for monetizing websites.
Ad Format:- Display Ads, Text Ads, Pop up/under
Payout:- $50 via PayPal.RevenueHits sign up

InfoLinks Ads

Infolinks is In-text link based ppc ad network. If you have text based rich site or blog then Infolinks is best choice for earn some revenue. The best part of Infolinks is they don’t need and space for banners. Infolinks show targeted ads for any relevant keyword from you content. You can also use keyword Tag cloud from Infolinks on you site or Infolinks can be use as search ads.  Infolinks don’t cover the spaces so that’s why you can use other ads banner from Adsense or other alternative to earn more revenue for site content.
Ad Format:- In-text ads, Search ads or In Tag cloud.
Payment:- Minimum Pay out $50 via PayPal or wire transfer.

Propeller Ads

Propeller is fastest growing multi ad format network. They provide detailed optimization for each site individually so that you can select best performing ad campaign. Its basically shown as CPM based ad network. But in actual this network is based on various models like CPM, CPA, CPC and CPL. In overall this is one of the best ad network.
Ad Format:- OnClick Ads, Video Ads, Mobile Ads on CPM, CPA, CPL and CPC bases.
Payout:- $100 Via Wire Transfer, Payoneer, Payza.

Clicksor Ads

This is also one of the best Alternative for other in-text based as well for banner ads. Clicksor is best and popular platform of advertiser and publisher. Clicksor having several advertising format like in-text ads and contextual banner ads. Clicksor divides publisher in two groups on the bases of total impressions. Clicksor is Bid based CPC and CPM ads networks. Its offer less CPC rates as compare to above Sites. If also offer Referral Program mean you earn 10% revenue from the Publisher you refer for using Clicksor.
Ad Format:- In-text and contextual banner ads, Pop under and other text based ads.
Minimum Payout:- $50 through check or PayPal.Clicksor sign up

SuperLinks

Superlinks is fastest growing new display based advertising network. Superlinks is one the best adsense alternative you don’t need to worry about adsense if you are using superlinks. Superlinks offer Super Exit link, Super display ads, Super Footer, Super Interstitial, Super tower with various different size of banners. Superlinks is working through Google doubleclick network that means in case no highest paying banner is visiable then adsense ads will be displayed to fill space. Superlinks is one the best solution for you they offer CPC and CPM based earning. Minimum payout is $100 via PayPal and $500 via payoneer wire transfer on the bases of NET35. So i recommend you to join superlink right now. Superlinks sign up


Chitika Ads

Chitika is also famous platform of pay per click bases of Search Targeted Ads, Local ads and Mobile Ads. Chitika ads are accepts only organic traffic drive by Search engines. So you will only earn revenue from clicks, if you have good visitor flow from search engines. Chitika Offers high CPC rates as compare to others but little bit low as compare to Adsense. But instead of others it is also good Adsense alternative. Chitika has Referring Program also you can refer others for using Chitika ads then you will earn 10% of Refer Publisher review for 10 months.
Requirement:- Organic Search Traffic is required for earning.
Ad Format:- Display banner ads, Text Ads.
Payout:- $10 via PayPal and $50 via Checks.Chitika sign up


Media.net Ads

Media.net is a Contextual pay per click based site by Combined Yahoo and Bing and powered by Media.Net. It is one of best Alternative of Adsense. Its CPC rates are also high and good. It is also Bid based CPC and CPM and CPA ads on the bases of eRPM. Media.net become most popular for advertiser and publisher within few years and makes best place in advertising. Unfortunately if you don’t get Adsense approval then i recommend you to apply for Media.Net
Requirement:- High quality content and Traffic from premium countries like USA, UK, Canada.
Ad Format:- Display Ads, Keyword Block Ads.
Payout:- $250 via PayPal or Wire Transfer.Media.net sign up


Affinity Ads

Affinity has also make their best place in advertising market. Affinity has adopts many different kind of ways for publisher to earn more revenue from their website by implementation in Toolbar, In-text, search suggestion, gaming ads, widget and such kinds of amazing implementation. Affinity is also Bid Rates network based on CPC , CPM and CPA with better eRPM rates. Affinity have highest revenue sharing upto 95% as compare to others.
Ad Format:- In-Search, In-Domain, In-Content, Display Ads, Mobile Ads.
Minimum payout:- $50 via PayPal.

Kontera Ads

Kontera is almost similar to Infolinks ads networks. It is based on In-text and in-image ads for your text content for any selected keywords. Kontera show relevant ads for keyword shown in double underline which is also looks irritating for users . Kontera offers Less CPC rates but they having higher CTR rates. Kontera is also compatible which Google Adsense and other Networks. They also don’t need any space of banner placement. So it is better way to earn side earnings with other Banners based ads. Kontera share 70% revenue with Publishers
Ad Format:- In-text based ads
Minimum Payout:- $50 PayPal or Wire Transfer.

Conversant Media

Conversant media Ads hold best position in advertising networks. It is based on CPC and CPM methods. Advertisement format used by Conversant have contextual ads, different size of banner, pop ads and many other different format. Its offers good CPC, CPM and CPL rates better lesser as compare to above networks.
Ad Format:- Display Ads, Text Ads, Video Ads, Mobile Ads, In-text, Flash ads
Minimum Payout:- $25 vie PayPal.

AdHitz

AdHitz is growing advertiser platform but its performance on the publisher platforms not so good. AdHitz having number different types of advertiser but their offers less CPC rates as compare to other publisher networks so that’s why publisher choose Adhitz lesser ad compare to others. But if their is no choice left then i recommend you to choose Adhitz. Otherwise try on another ads programs first.
Ad Format:- Flat Rates PPC ads, Banner Ads.
Minimum payout:- $25 via PayPal.


I hope You enjoy this article about best ppc ad networks for publishers. I try explain only the best ppc networks from where you can earn some revenue. Their are numbers of PPC publisher site are available which we have not listed just because of their low cpc rates and performance. So i recommend you to choose any network which you like. We have updated new list of best ppc ad network for publisher on our new blog. Must check it for all new coming ppc ad networks.
Note:- Don’t use more that 2,3 three different networks on same site. Their are many bad effects on site as well on earnings also.
If you have any other best pay per click website feel free to share your experience in comment box.
Swicther!
Layout
Boxed Full
Boxed Background Image
Main Color
#007ABE

Shawon Khan

{picture#https://1.bp.blogspot.com/-BDYMzedJdjs/UAI7F8ZNFKI/AAAAAAAAACY/yhMlXb-dkDU/s50/avatku.jpg} Nor is it at all prudent for the hunter to be over curious touching the precise nature of the whale spout. {facebook#http://facebook.com} {twitter#http://twitter.com} {google#http://google.com} {pinterest#http://pinterest.com} {youtube#http://youtube.com}

Contact Form

Name

Email *

Message *

Powered by Blogger.