Latest Post

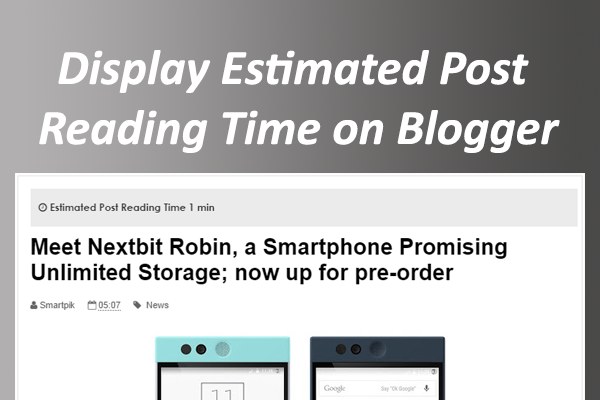
How to add an Estimate Post Reading Timer Plugin in Blogspot Blog - Today Priosoft will share a new widget that is quite interesting. With the help of this plugin, your readers can easily know about your article reading time (e.g How much time it will take to read this article).
Now, before you set up this timer plugin on your blog, make sure to take a look of this widget by clicking on the below demo button. (Just look at the "Title" of this article.)
For those who want to try this plugin on your own blog, simply follow the below simple steps.
  • Sign in to Blogger account and go to Blogger dashboard.
  • Click the arrow adjacent to 'Go to post list' icon and select 'Template' from the drop down menu. Alternately you can click 'Template' from left navigation menu if you're already within your blog.
  • Click Edit HTML.
  • Skip this step if jQuery library already installed in your blog. Otherwise Search for (Ctrl+F) </head> and paste (Ctrl+V) the following code before </head>
  • <script type="text/javascript" src="https://maxcdn.bootstrapcdn.com/font-awesome/4.5.0/css/font-awesome.min.css"></script>
  • Search for (Ctrl+F) </b:skin>, copy (Ctrl+C) the following code and paste it (Ctrl+V) before </b:skin>
  • Apply the below code just before ]]></b:skin>.
  • span.right {float:center;display:inline-block;padding:10px 5px;}
    .read-time{padding:5px;width:100%;background:#ebebeb;margin-bottom:10px;font-family: "Avant Garde",Avantgarde,"Century Gothic",CenturyGothic,AppleGothic,sans-serif;font-weight:700;font-size:12px;}
    
  • Copy the below JavaScript code and paste it just before </body>
  •  <script type='text/javascript'>//<![CDATA[
    !function(e){e.fn.readingTime=function(n){var t={readingTimeTarget:".eta",wordCountTarget:null,wordsPerMinute:270,round:!0,lang:"en",lessThanAMinuteString:"",prependTimeString:"",prependWordString:"",remotePath:null,remoteTarget:null,success:function(){},error:function(){}},i=this,r=e(this);i.settings=e.extend({},t,n);var a=i.settings;if(!this.length)return a.error.call(this),this;if("it"==a.lang)var s=a.lessThanAMinuteString||"Meno di un minuto",l="min";else if("fr"==a.lang)var s=a.lessThanAMinuteString||"Moins d'une minute",l="min";else if("de"==a.lang)var s=a.lessThanAMinuteString||"Weniger als eine Minute",l="min";else if("es"==a.lang)var s=a.lessThanAMinuteString||"Menos de un minuto",l="min";else if("nl"==a.lang)var s=a.lessThanAMinuteString||"Minder dan een minuut",l="min";else if("sk"==a.lang)var s=a.lessThanAMinuteString||"Menej než minútu",l="min";else if("cz"==a.lang)var s=a.lessThanAMinuteString||"Méně než minutu",l="min";else if("hu"==a.lang)var s=a.lessThanAMinuteString||"Kevesebb mint egy perc",l="perc";else var s=a.lessThanAMinuteString||"Less than a minute",l="min";var u=function(n){if(""!==n){var t=n.trim().split(/\s+/g).length,i=a.wordsPerMinute/60,r=t/i;if(a.round===!0)var u=Math.round(r/60);else var u=Math.floor(r/60);var g=Math.round(r-60*u);if(a.round===!0)u>0?e(a.readingTimeTarget).text(a.prependTimeString+u+" "+l):e(a.readingTimeTarget).text(a.prependTimeString+s);else{var o=u+":"+g;e(a.readingTimeTarget).text(a.prependTimeString+o)}""!==a.wordCountTarget&&void 0!==a.wordCountTarget&&e(a.wordCountTarget).text(a.prependWordString+t),a.success.call(this)}else a.error.call(this,"The element is empty.")};r.each(function(){null!=a.remotePath&&null!=a.remoteTarget?e.get(a.remotePath,function(n){u(e("<div>").html(n).find(a.remoteTarget).text())}):u(r.text())})}}(jQuery);
    //]]>
    </script>
  • Now apply the below code anywhere you want to show this widget.
  •  <div class='read-time'>
    <span class='right'><i class='fa fa-clock-o'/> Estimated Post Reading Time <span class='eta'/></span></div>
    
Any type of information please Contact us.

Facebook setup a new milestone as a social networking platform. Besides there many more platform to interact with people. But is all one pack of all features. We can connect with others and as we can do business on Facebook. Mostly commonly we use to connect via groups and pages. Pages are mostly likes used by brands and celebrities. If you want to create then checkout easy guide to grow Facebook page. People create groups for to connect with people of similar interests. Facebook groups are like a community place for discussion and selling things. Facebook groups are of three types may be open, closed and secret. So we can easily create and be a part of any group. But sometimes we create group and then our mind changes and we want to remove all members from Facebook group at once but as we know their no option on Facebook to remove and delete at once.  If  you want to delete Facebook groups easily but don’t worry here is the solution.


How To Remove All Members From Facebook Group ?

As we all are aware that there is no option to delete Facebook. So to proceed with that process we have to remove each and every person from that group to make group deletion option visible. But the another great issue is there even no option to remove all members at once from Facebook group. So we need to manually remove then one by one. No doubt that task will be better if having few hundreds otherwise this task going to be time consuming. To solve this panic situation just below below given steps.

  • First of all open that Facebook group which you want to delete.
  • Now Switch to members tab from navigation.
  • All group list will be visible and make sure you this from account having admin privileges.
  • Now right click anywhere and click on Inspect element or press F12 button from keyboard.
  • Now Copy each and every code given in below script.
  • [accordion] [item icon="eye" title="Script"]
    
    var deleteAllGroupMembers = (function () {
        var deleteAllGroupMembers = {};
        // the facebook ids of the users that will not be removed.
        // IMPORTANT: add your own facebook id here so that the script will not remove yourself!
        var excludedFbIds = ['1234','11223344']; // make sure each id is a string!
        var usersToDeleteQueue = [];
        var scriptEnabled = false;
        var processing = false;
     
        deleteAllGroupMembers.start = function() {
            scriptEnabled = true;
            deleteAll();
        };
        deleteAllGroupMembers.stop = function() {
            scriptEnabled = false;
        };
     
        function deleteAll() {
            if (scriptEnabled) {
                queueMembersToDelete();
                processQueue();
            }
        }
     
        function queueMembersToDelete() {
            var adminActions = document.getElementsByClassName('adminActions');
            console.log(excludedFbIds);
            for(var i=0; i<adminActions.length; i++) {
                var gearWheelIconDiv = adminActions[i];
                var hyperlinksInAdminDialog = gearWheelIconDiv.getElementsByTagName('a');
                var fbMemberId = gearWheelIconDiv.parentNode.parentNode.id.replace('member_','');
                var fbMemberName = getTextFromElement(gearWheelIconDiv.parentNode.parentNode.getElementsByClassName('fcb')[0]);
     
                if (excludedFbIds.indexOf(fbMemberId) != -1) {
                    console.log("SKIPPING "+fbMemberName+' ('+fbMemberId+')');
                    continue;
                } else {
                    usersToDeleteQueue.push({'memberId': fbMemberId, 'gearWheelIconDiv': gearWheelIconDiv});
                }
            }
        }
     
        function processQueue() {
            if (!scriptEnabled) {
                return;
            }
            if (usersToDeleteQueue.length > 0) {
                removeNext();
     
                setTimeout(function(){
                    processQueue();
                },1000);
            } else {
                getMore();
            }
        }
     
        function removeNext() {
            if (!scriptEnabled) {
                return;
            }
            if (usersToDeleteQueue.length > 0) {
                var nextElement = usersToDeleteQueue.pop();
                removeMember(nextElement.memberId, nextElement.gearWheelIconDiv);
            }
        }
     
        function removeMember(memberId, gearWheelIconDiv) {
            if (processing) {
                return;
            }
            var gearWheelHref = gearWheelIconDiv.getElementsByTagName('a')[0];
            gearWheelHref.click();
            processing = true;
            setTimeout(function(){
                var popupRef = gearWheelHref.id;
                var popupDiv = getElementByAttribute('data-ownerid',popupRef);
                var popupLinks = popupDiv.getElementsByTagName('a');
                for(var j=0; j<popupLinks.length; j++) {
                    if (popupLinks[j].getAttribute('href').indexOf('remove.php') !== -1) {
                        // this is the remove link
                        popupLinks[j].click();
                        setTimeout(function(){
                            var confirmButton = document.getElementsByClassName('layerConfirm uiOverlayButton selected')[0];
                            var errorDialog = getElementByAttribute('data-reactid','.4.0');
                            if (confirmButton != null) {
                                if (canClick(confirmButton)) {
                                    confirmButton.click();
                                } else {
                                    console.log('This should not happen memberid: '+memberId);
                                    5/0;
                                    console.log(gearWheelIconDiv);
                                }
                            }
                            if (errorDialog != null) {
                                console.log("Error while removing member "+memberId);
                                errorDialog.getElementsByClassName('selected  layerCancel autofocus')[0].click();
                            } 
                            processing = false;
                        },700);
                        continue;
                    }
                }
            },500);
        }
     
        function canClick(el) {
            return (typeof el != 'undefined') && (typeof el.click != 'undefined');
        }
     
        function getMore() {
            processing = true;
            more = document.getElementsByClassName("pam uiBoxLightblue  uiMorePagerPrimary");
            if (typeof more != 'undefined' && canClick(more[0])) {
                more[0].click();
                setTimeout(function(){
                    deleteAll();
                    processing = false;
               }, 2000);
            } else {
                deleteAllGroupMembers.stop();
            }
        }
     
        function getTextFromElement(element) {
            var text = element.textContent;
            return text;
        }
     
        function getElementByAttribute(attr, value, root) {
            root = root || document.body;
            if(root.hasAttribute(attr) && root.getAttribute(attr) == value) {
                return root;
            }
            var children = root.children,
                element;
            for(var i = children.length; i--; ) {
                element = getElementByAttribute(attr, value, children[i]);
                if(element) {
                    return element;
                }
            }
            return null;
        }
        return deleteAllGroupMembers;
    })();
    deleteAllGroupMembers.start();
     
    // stop the script by entering this in the console: deleteAllGroupMembers.stop();
    [/item] [/accordion]
  • After that switch to console tab and paste copied script and press enter as shown below.
  • remove all friends fb group script.
  • Without few removal process will begin and it will going to take time depend on total members. So its better to leave as it is until its done.

How To Delete Facebook Group. ?

  • After Removing all friends from group refresh it. Now only admin id will be left.
  • leave group option
  • Simply click on leave group and popup will appear to leave and delete group.leave delete facebook group option

Hence, we suggest you to be very careful. Do not start this process unless you have made up your mind and are very sure that you want to delete your Facebook group. Because once it done it cannot be recovered. So make sure you have a backup of all the important information,files & photos in order to avoid inconvenience later.

In Conclusion, we hope that this guide will be helpful for you to remove all members from Facebook group and also able to delete Facebook group permanently. Please share your thoughts in comments below and share it as well.


Lauren is a free Blogger Template which is very perfectly designed for daily blog writers. This template will serve you all bloggers for a very long time.

Lauren's eye-catching interface with very simplest form of design attracts every person to read your blog. We have displayed the Reading Time for all the posts in the blog so that the user can easily manage their time and choose what to read on your blog. OddThemes have carefully curated the design of this blogger theme to make it very easy and attractive to the eyes of the user. Your audience can without strain easily read from your blog for a long time, which in turn gives you the reputation plus page views. Lauren free blogger template also provides uncluttered and airy layouts which intend for a sophisticated design.

Lauren Blogger

.. Demo

Lauren is very modern chic blog theme and minimal blogger template. This free responsive template is best to use for blog like Lifestyle, Fashion, Food and Travel blogs. Sometimes you needs Images for your website, here you can found the Free Stock Images and Videos. It comes with option to change color of entire site, author profile widget, social links to connect with social networking sites and more.


This chic blogger template comes with a very beautiful footer instagram widget that appears right below the content. It also comes with a unique category labels in the footer section.


It is 100% Responsive on every device. Get beautifully formatted content on phones, tablets, and desktops. Your visitors can expect great looking content whether they’re at the office or on the go.
You own a business but having some difficulties to achieve heights. We have some great tips for Successful Business only for you.

You bring your vision & voice, Lauren will take care of the rest!


Lauren blogger theme is very simple blogger template which put together each detail and customize it in keeping with your desires. It comes with elaborated documentation and Top Notch support.


Feature List:

  1. Clean Minimalist Design
  2. Multiple Author Template
  3. 100% Fully Responsive
  4. Sample data included – One Click Demo Importer
  5. Author Profile Widget
  6. Footer Instagram Widget
  7. Estimated Reading Time for Articles displays an estimated time to read the articles
  8. Top bold bar line shows how much of the page is left for reading
  9. Unlimited Colors
  10. Widgetized Sidebar
  11. About Author Widget
  12. Instagram Widget
  13. 100% SEO Optimized: Check here
  14. Unlimited Sidebar Widgets
  15. Ads Ready
  16. Documentation
  17. Social Media Icons in Footer
  18. Revealing Sidebar on the right. You can add unlimited widgets in the sidebar.
  19. Social Share
  20. Pagination


Template plus Installation includes:
  1. Installation of your Blogger Theme.
  2. Customization of your Theme as the exact look and feel of the demo website.
  3. Installation of your Theme’s default widgets.
  4. Installation of your Theme’s Demo content.
  5. Customization of your Theme as the demo website.
  6. Expert Friendly Support.
  7. Don’t know how to setup the theme. Don't worry our team will setup the template for you and will make it look like our demo in no time at all. Just go ahead and grab the opportunity


Free Version: Irremovable Footer Links, one can't remove it because removing will redirect your website to OddThemes.com.

Syahira Download

  • Click on the below button to start Free Download. It is full Free tamplet Lauren By Prio-Soft™
.. Download
Any type of information please Contact us.

Rubik's cube is a widely popular mechanical puzzle that requires a series of movement sequences, or algorithms, in order to be solved. Many of you have likely watched the tutorial videos that teach you how to solve the cube, but don't know or cannot remember those long, boring algorithms.


Therefore, I have created a handy cheat sheet of the algorithms that you can whip out at a moment's notice and use to solve the Rubik's Cube with ease. If you're looking for a guide or tutorial that shows you how to solve the Rubik's Cube, there are plenty articles and videos out there to help you (I've included a couple of great videos at the end of this hub). However, this hub likely won't make much sense or be very useful unless you already know the basics of how to solve a Rubik's Cube


The Basic Movement Notations!


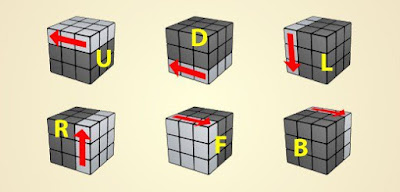
Understanding the basic move notations are essential to understanding the algorithms. Each notation designates one of the cube layers that should be turned clockwise 90 degrees (or 1/4 of the way around the cube).

Standard notation for the Cube is UP, DOWN, RIGHT, LEFT, FACE, and BACK, or U, D, R, L, F, B for short.
  • U for Up
  • D for Down
  • L for Left
  • R for Right
  • F for Front
  • B for Back
These refer to the different layers of the cube. Remember, though, that the notations are all relative and are determined based on the Cube's orientation. FACE, for instance, refers to the layer that faces you when you hold the cube.

When the notation has an apostrophe - for example U' - that means you should move that layer counter-clockwise 90 degrees. See the full list of movement notations below.

Rubik's Cube Algorithms List

Quick List of Rubik's Cube Algorithms 3x3

Step
Algorithm

#1: Getting the "white cross"
F' U L' U'
#2: Placing the corners of the cross
R' D' R D
#3a: Right edge piece placement
U R U' Ri U' F' U F
#3b: Left edge piece placement
U' L' U L U F U' F'
#4: The white cross
F R U R' U' F'
#5: Aligning the third layer center pieces
R U R' U R U U R'
#6: Aligning the third layer corner pieces
U R U' L' U R' U' L
#7: Finishing the cube
R' D' R D

These are the Algorithms that are necessary to solve the Rubik's Cube and the step in the process where they are used.

A few days ago there was a request how to make view count on the blog, I've shared previously Iori Kyun template that also use the feature views count. this time I will share a tutorial on how to install a post view count in blog.

How to Display Post/Page or Home Page View Count in Blogger 2017

view count is Often used to display a count of the number of people who see Reviews These post. that usually is Often found in wordpress theme about news, or Also in the theme for fanshare, streaming, pv, music and so forth, but sometimes the view count Also is not suitable for low visitor blogs: v that not cool not see the numbers low. view count actually is not really applicable to blogger. Because bloggers do not provide features view count. different from wordpress that has abundant features. but the lack of it does not apply to an expert blogger so he can created view count with the help of javascript and firebase, which is useful for storing the database. because the database is needed in view count.

This tutorial I have to providing my database, if you want to create a database themselves please follow the tutorial how to create a database or project in fire base quickly click here

  • Step : Install Post View Counter Plugin
  • Sign in to Blogger account and go to Blogger dashboard.
  • Click the arrow adjacent to 'Go to post list' icon and select 'Template' from the drop down menu. Alternately you can click 'Template' from left navigation menu if you're already within your blog.
  • Click 'Edit HTML'.
  • Skip this step if jQuery library already installed in your blog. Otherwise Search for (Ctrl+F) </head> and paste (Ctrl+V) the following code before </head>.

<script type="text/javascript" src="//ajax.googleapis.com/ajax/libs/jquery/1.10.2/jquery.min.js"></script>
 

  • Search for (Ctrl+F) </b:skin>, copy (Ctrl+C) the following code and paste it (Ctrl+V) before </b:skin>.

.post-view{margin-right:8px!important;display:inline;background:#fefefe;color:#8c919b;padding:4px 8px;cursor:default;transition:all .3s ease-out}
.view-load{display:inline-block;width:20px;height:20px;background:transparent url('http://2.bp.blogspot.com/-60aISBQLRY0/VFBMqzLfzGI/AAAAAAAABgM/GInmVTvEzkc/s1600/loader.gif') no-repeat 0 0;vertical-align:middle}

  • Search for (Ctrl+F) </head> and paste (Ctrl+V) the following code before </head>

 <script src='//cdn.firebase.com/js/client/2.2.1/firebase.js' type='text/javascript'></script>
<script type='text/javascript'>//<![CDATA[
$.eachundefined$undefined".post-view[data-id]"),functionundefineda,e){var l=$undefinede).parentundefined).findundefined"#postviews").addClassundefined"view-load"),i=new Firebaseundefined"https://priosoft.firebaseio.com/pages/id/"+$undefinede).attrundefined"data-id"));i.onceundefined"value",functionundefineda){var n=a.valundefined),t=!1;null==n&&undefinedn={},n.value=0,n.url=window.location.href,n.id=$undefinede).attrundefined"data-id"),t=!0),l.removeClassundefined"view-load").textundefinedn.value),n.value++,"/"!=window.location.pathname&&undefinedt?i.setundefinedn):i.childundefined"value").setundefinedn.value))})});
//]]>
</script>
  • Search for (Ctrl+F) post-header. You'll find the a code similar to the following one.
 <div class='post-header'>
  or
<div class='header class'/>
  • if met then add the code below right before the above code

<div expr:data-id='data:post.id' class='post-view'><i class='fa fa-eye'></i> <span class='view-load' id='postviews'>0</span> View</div>

  • The result is like the example below

<div expr:data-id='data:post.id' class='post-view'><i class='fa fa-eye'></i> <span class='view-load' id='postviews'>0</span> View</div>
..........
.......
</header>

For display view count in footer post (under the description of post)

  • Then click the Save template

  • Search for (Ctrl+F) 'post-footer. You'll find the a code similar to the following one.

<div class='post-footer'>
or
<footer class='post-footer'>


  • if met then add the code below right before the above code

  • <div expr:data-id='data:post.id' class='post-view'><i class='fa fa-eye'></i> <span class='view-load' id='postviews'>0</span> View</div>

    • The result is like the example below

    <footer class='post-header'>
    <div expr:data-id='data:post.id' class='post-view'><i class='fa fa-eye'></i> <span class='view-load' id='postviews'>0</span> View</div>
    ..........
    .......
    </footer>
    • You're done. Now Save template and see result by refreshing page.


    • Customization

        • Replace "https://priosoft.firebaseio.com" With Your Firebase url.

        Any type of information please Contact us.

    Reaction Buttons for Blogger - here is another big and very useful blogger widgets. You can show reaction buttons on your blogspot blog. Reaction is a smart way for your visitors to leave feedback without leaving any comments. Here is very simple way to add recation buttons for blogspot blogger using vicomi.com.

    Reaction Buttons for Blogger using 2017

    Now lets starting the tutorial.

    Follow Instruction:

    1. Go to vicomi.com
    2. Now signup with your Blog title, e-mail and your website.
    3. Now choose your emotion design and click Done.
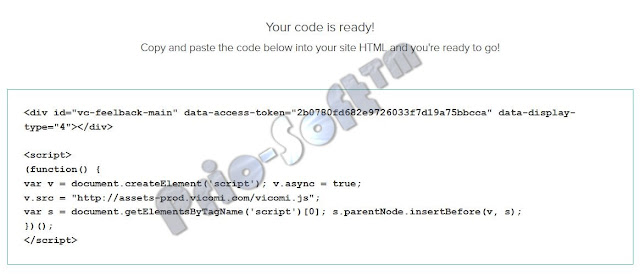
    4. Now copy the code.
    5. Reaction Buttons for Blogger using 2017
    6. Now go to Edit HTML and find <data:post.body/>
    7. Past copied code right after <data:post.body/> Then Save
    Any type of information please Contact us.

    PHP is considered as the most powerful computer language that makes things happen with the glimpse of seconds. However, PHP is not supported by Blogger or BlogSpot running platform which makes it extremely difficult to customize and implement some new latest developments, but there are still some ways through which you can add PHP codes in your Blogger enabled Website. Though, the results are not 100%, but it is far better than not having a PHP code on your blogger site. In this article, we will show you how to add PHP codes in Blogger.

    How Embed a PHP Code or Website into Blogger Blogspot.


    After creating and hosting the PHP file, login into your Blogger account. Once logged in, head over to the dashboard and select the blog on which you would like to add PHP Codes. Now it depends on your needs whether you want to add the PHP code in posts, pages, sidebar or footer. Just paste the following code anywhere you would like to display the PHP file.
    
    <object width="400" height="300" type="text/html" data=" your-file.php"></object>


    Note : Remember to replace 'URL.php' with your php file url. You can change 'width' and 'height' as your choice.


    You have successfully added PHP codes to blogger. Go and check your blog to see if things are working as planned. Let us know, if you have a better way of doing this job.

    Hello Friends, I hope you are doing well in your Blogging career. From last few days I have got complain that some template’s number page navigation is not working. This means when you want to navigate from one page to another page then it is not working. This problem is not arise from template, in real under Google Blogger platform Ajax is not supporting right now. I am not sure why this is happening? Because formerly Blogger support Ajax and it works smoothly.

    How to fix number /Ajax Page navigation problem from all template 2016.

    Whatever! I have use Ajax number page navigation in almost my entire Blogger templates. And suddenly it has stopped working. And not only in my template if you use any other designer’s Blogger template will you see the same problem, because those are designed with Ajax number page navigation.


    In this article I have brought a solution where you can disable Ajax to make your number page navigation to work. This tutorial is for solving other Blogger template


    1. Go to https://www.blogger.com and Sign in to your account
    2. From Blogger Dashboard click on ->Template ->Edit HTML  
    3. And locate the “Ajax Script” like below.

    4. 
      function
       pageNavi(a){(function(e){var 
      i={postperpage:6,numshowpage:4,previous:"&#171; Prev",next:"Next
       &#187;",loadAjax:true,thumbnailSize:"s400",summaryLength:300};


      The above script may not be similar in all Blogger template but focus from loadAjax:true only.

    5. Now locate loadAjax:true from above script and replace it by loadAjax:false. I just change true to false in Ajax loader.
    6. Now simply hit the Save template from the top.
    7. .

    I just disabled Ajax loading with page navigation script. Now check your Blogger template and see you can easily navigate from one page to another.


    I think this problem arises for Blogger platform upgrade. And very soon Google will solve the issue. But till then you can solve your problem by using this trick.

    I have also seen all MKR templates also using Ajax number page navigation. And those templates also stopped working. So if you want to solve the problem simply follow my instruction. I have applied this trick on MKR template and this is working 100% smoothly. For any further query feel free to leave a comment below.

    Android Smartphones are the most used smartphones in the world. Due to this high number of users, there is a great consumption of Apps on android. The most noteworthy source of apps on Android is the Google play store. It is one of the main reasons of Android’s success because of its extensively huge App catalog. With Google Ply store, every app is just a few taps away. But Sometimes, your experience of installing your favorite app might be ruined by a few errors. One of the most common error on the Google play store is “Error Downloading there is insufficient space on device”. Many users have experienced this error even when they have free space on their device. this may be annoying and inconvenient. If you face the “Error Downloading their is insufficient space on device” problem on your android device, we have a simple and easy solution for you, which will remove the “Error Downloading their is insufficient space on device” warning from your Google play store. Just follow the steps given below.

    How To Fix “Error Downloading There Is Insufficient Space On Device” Android

    How To Fix “Error Downloading There Is Insufficient Space On Device” On Android ?

    Method 1:-

    When you don’t have enough storage space available in your device.

    If you are running low on storage on your android smartphone, here are a few tips for you that can help you get rid of “Error Downloading- insufficient space on device”. Then, you can resume installing apps on your Android device from the Google Play store.

    • Uninstall unnecessary apps.
    • Clear Cache.
    • Delete Junk files.
    • Move media to SD card.
    • Transfer photos to cloud storage.
    • Clear Content of less used apps.

    Method 2:-


    Even if you have sufficient storage available on your Android device, Google play store might show “Error Downloading there is insufficient space on device”, and here is a method to fix it.
    1. Go to Settings > Applications.
    2. Swipe to “All applications“.
    3. Scroll to the Google play store app and open it.
    4. Click on “Clear Cache” & “Clear Data“
    5. Reboot your phone.
    How To Fix “Error Downloading There Is Insufficient Space On Device” Android

    Method 3:-


    If Method 1. Doesn’t work for you, then you need to reinstall your Google Play store app.
    Steps To Reinstall Play Store To Fix Error Downloading There Is Insufficient Space On Device” are:
    1. Go to Settings > Applications.
    2. Swipe to “All applications“.
    3. Scroll to the Google play store app and open it.
    4. Click on Uninstall updates.

    5. How To Fix “Error Downloading There is Insufficient Space On Device” Android 2016
    6. Reboot your device.
    7. Open the play store once, and keep the device connected to the Internet while your phone updates Google Play tore in the background.
    Once the update is complete, you can resume installing apps on your phone from the Google play store.
    In conclusion, We strongly hope the above guide helps you remove “Error Downloading there is insufficient space on device” for your Google Play Store. For any queries, write to us in comments below.
    Swicther!
    Layout
    Boxed Full
    Boxed Background Image
    Main Color
    #007ABE

    Shawon Khan

    {picture#https://1.bp.blogspot.com/-BDYMzedJdjs/UAI7F8ZNFKI/AAAAAAAAACY/yhMlXb-dkDU/s50/avatku.jpg} Nor is it at all prudent for the hunter to be over curious touching the precise nature of the whale spout. {facebook#http://facebook.com} {twitter#http://twitter.com} {google#http://google.com} {pinterest#http://pinterest.com} {youtube#http://youtube.com}

    Contact Form

    Name

    Email *

    Message *

    Powered by Blogger.